
10 月 . 01, 2024 03:21 Back to list
Guide to Installing Thrust Ball Bearings for Optimal Performance and Longevity
Installation Guide for Thrust Ball Bearings
Thrust ball bearings are designed to handle axial loads and operate with a relatively low friction coefficient. They are commonly used in various applications, including automotive, industrial machinery, and aerospace systems. Proper installation is crucial for ensuring optimal performance and longevity of the bearing. This article will guide you through the process of installing thrust ball bearings.
Understanding Thrust Ball Bearings
Before diving into the installation process, it’s important to understand the structure and function of thrust ball bearings. Typically consisting of two races and a ball set, these bearings can accommodate axial loads in one direction. They are available in various sizes and configurations, which makes them suitable for numerous applications. For best results, always choose a bearing that meets the specifications of your application.
Tools and Materials Needed
Before beginning the installation, gather the necessary tools and materials
1. Thrust Ball Bearing - Ensure you have the correct size and type needed for your application. 2. Socket Wrench Set - For loosening and tightening the bearing housing or related hardware. 3. Caliper or Micrometer - To measure the bearing and ensure precise fit. 4. Cleaner - To remove any debris or contaminants. 5. Lubricant - Use a recommended grease or oil suitable for the bearing's operating conditions. 6. Safety Gear - Gloves and safety glasses to protect against any debris during installation.
Installation Process
1. Preparation of the Work Area Begin by cleaning the work area where the bearing will be installed. Remove any dirt, dust, or old lubricant to prevent contamination, which can significantly reduce bearing life.
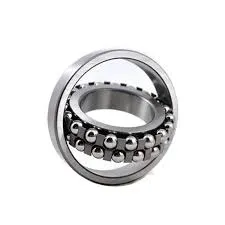
thrust ball bearing installation
2. Inspection of Components Before installation, carefully inspect the thrust ball bearing and its housing. Look for any signs of damage, pitting, or corrosion. Any defects can compromise the bearing performance and should be addressed before proceeding.
3. Check Dimensions Use a caliper or micrometer to measure the housing bore and ensure that it is compatible with the bearing. The fit should be snug, without excessive play.
4. Lubrication Apply lubricant to the races of the thrust ball bearing. This is crucial as it helps minimize friction and wear during operation. Be sure to use a lubricant that matches the manufacturer's specifications.
5. Placing the Bearing Carefully position the thrust ball bearing into its designated spot within the housing. Make sure that it is aligned properly to avoid any misalignment that could lead to premature failure.
6. Secure the Assembly Depending on the design, you may need to install a locking mechanism, such as a snap ring or set screw, to hold the bearing in place. Tighten these components to the manufacturer’s torque specifications using a socket wrench.
7. Final Checks Once secured, manually rotate the bearing to ensure it spins freely without any binding or unusual noises. This preliminary check is vital in identifying potential issues right away.
8. Sealing If applicable, install any seal or shield to protect the bearing from environmental contaminants. Proper sealing will enhance the operational lifespan of the bearing.
Conclusion
The installation of thrust ball bearings requires attention to detail and proper execution to ensure optimal performance. Following these steps will help in achieving a successful installation, which can lead to increased efficiency and reduced maintenance costs in the long run. Proper handling, lubrication, and alignment are crucial for the longevity of the bearing in your specific application. Always refer to the manufacturer's guidelines for specifications and maintenance recommendations. By adhering to these practices, you will contribute significantly to the reliability of your machinery and equipment.
Latest news
-
Unlocking Efficiency with Spherical Roller Bearings
NewsOct.29,2024
-
The Ultimate Guide to Thrust Ball Bearings
NewsOct.29,2024
-
The Power of Thrust Roller Bearings: Engineered for Excellence
NewsOct.29,2024
-
The Power of Deep Groove Ball Bearings for Your Application Needs!
NewsOct.29,2024
-
The Power and Performance of Cylindrical Roller Bearings
NewsOct.29,2024
-
High-Quality Ball Bearing Manufacturing Machines
NewsOct.29,2024